
Model Description
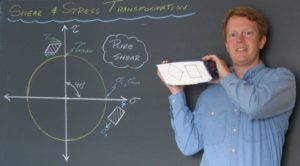
Students often have difficulty with shear and stress/strain transformation. To give a quick demonstration of pure shear and stress transformation, blocks are drawn on the side of a BIG book to show the effects of shear and transformation of axes. This demonstration should take 3-5 minutes.
Engineering Principle
Shear occurs when parallel planes within an object tend to move laterally with respect to each other, rather than away or towards each other, as occurs with more-familiar normal stresses and strains. The most commonly cited examples of this phenomenon are seen in bolts or other connections where the connected surfaces tend to move laterally with respect to one another. Unfortunately, the connection case poorly illustrates the more usual case of shear caused by a general state of stress. To illustrate the more common case, blocks, similar to stress blocks, are drawn on the pages of a stiff-spined book and the book is placed under pure shear. By offsetting the two blocks by 45 degrees, one block is placed in pure shear, while the other block sees no shear at all. This is best illustrated using Mohr’s circle.
What You Need
| Item | Quantity | Description/Clarification |
|---|---|---|
| Large book with a stiff spine | 1 | The book must have a stiff spine so that the imposed motion will cause pure shear. |
| Marker | 1 | A black permanent marker works best. Ensure that marks are dark against white pages so the students can see the demonstration from all areas of the classroom. |
| Cardboard square | 1 | Business cards or cereal boxes can be easily cut into a square guide for the demonstration. |
How It’s Done
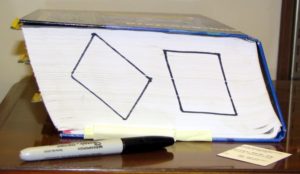
Before Class: Cut out a square of stiff cardboard, and draw careful squares at the orientations shown on the same end of the book. Students will suspect a trick, so make sure they can see everything at the same time. Ensure the squares are offset by 45 degrees so that one is in pure shear and the other is at the orientation of the principal stresses.

In Class: Point out to the students that the marks on the pages are the same size, and the only change is the orientation of the marks. Discuss the state of pure shear in detail, and then point out the fact that one of the blocks is in pure shear and one has no shear, even though they are drawn on the same pages. Draw Mohr’s circle for the case of pure shear, with the circle centered at the origin, to illustrate how normal stresses still exist, and where they should expect to find them.
Observations: Students should observe that the magnitude and type of stress varies according to the orientation of the axis system (figure below). Further, they should note that maximum shear and maximum normal stresses lie 45 degrees apart in a given stress state, 90 degrees on Mohr’s circle.
Additional Application: Many students will continue to struggle with this concept throughout the semester. Keep a marked up version of the book in the classroom and office for reference when a student is struggling with the “what does it all mean?” part of stress transformation. It also helps to discuss how some materials, like the book, resist different type of stress differently, so it’s important to quantify all the stress states. For instance, the book takes compression very well, shear somewhat poorly, and simply cannot resist tension normal to the pages. Thus, both the magnitude and orientation of the stresses within an object are key analysis outputs and design inputs.